Posted on Leave a comment

foam & mat repair led to costly remodel

a rotted subfloor and mold is discovered under a failed bathtub floor repair attempted with a glued on mat and foam - www.joyofstcroix.com Joy of St Croix Tub Repair and More

"Expanding Foam & Glued-on Mat" method of bathtub floor repair led to a costly bathroom remodeling

How does a bathtub floor break to begin with?

The floor of a fiberglass bathtub is constructed like an Oreo cookie.

A bathub floor is constructed like an Oreo cookie

 It consists of a core, usually press-wood, which is sandwiched between two layers of fiberglass.

Between the bottom layer and the subfloor is a hollow area.

how is a bathtub floor built
cross section of a bathtub floor

Without support, the area where a person repeatedly stands weakens over time and the tub floor breaks.

The diagram shows that without support the tub floor weakens and eventually breaks

~ just like breaking an Oreo cookie

A bathtub floor can crack like an Oreo cookie http://joyofstcroix.com repairs broken and cracked bathtub floors

Just like an Oreo cookie that soaks up milk, the core will become soft and squishy and will fall apart.

A broken bathtub core can soak up water like an Oreo cookie soaks up milk http://joyofstcroix.com repairsbroken bathtub floors

The core will never regain its strength or rigidity even if it can dry out.
The core needs to be replaced.

www.joyofstcroix.com rebuilds broken and cracked bathtub floors

The customer was told that expanding foam would fix the problem

Instead of removing the damaged wood core and repairing the fiberglass, a ridiculous but very common method used by bathtub repair companies is to inject expanding foam and glue on a mat.

What is the
"expanding foam and
glued-on bathmat"
method of repairing a bathtub floor?

The expanding foam method involves using an expandable urethane foam originally used for flotation devices and taxidermy.

Holes are drilled in the broken floor and the foam is injected in the hope that it will magically expand only where it's supposed to be and provide a solid structural support to the bottom layer of non-repaired fiberglass and the non-repaired core. A two-part urethane adhesive is used to glue a mat onto the floor instead of reglassing the top layer and applying a new texture. 

Let's examine a visual inspection of a failed "foam and mat" repair

We'll look at the video first and then take a closer look.

preliminary inspection

The purpose for placing the order was that the floor was weak and spongey where a person would stand to take a shower, and a crack was running from the drain to the front of the unit.

The first thing noticed was the presence of a glued-on mat - suggesting that the magic foam method was used, which unfortunately for the homeowner, turned out to be correct.  A closer look at the glued-on mat revealed that it wasn't only cracked but delaminating. The reason for delamination is usually that the floor it's glued to has deteriorated and fallen away, and the crack rather confirms this. Water will have seeped into the delaminated area which will have extended to the original damage that was covered by the glue-on mat thus causing more damage.

a broken fiberglass bathtub shower floor. text-glued on mat has cracked. logo-Joy of St Croix
the glued on bathmat has cracked
a broken fiberglass bathtub shower floor. text-glued on mat has cracked. logo-Joy of St Croix
a closer look at the crack in the glued-on bathmat
a jack knife points to a crack in a glued on bathmat. text-note the crack. logo-Joy of St Croix
Note the crack
a jackknife is slipped between a glued-on bathmat and the floor of a fiberglass tub with the knife blade's position marked with a dotted line. text-mat delaminating. logo-Joy of St Croix
The bathmat is delaminating from the floor

exploratory inspection

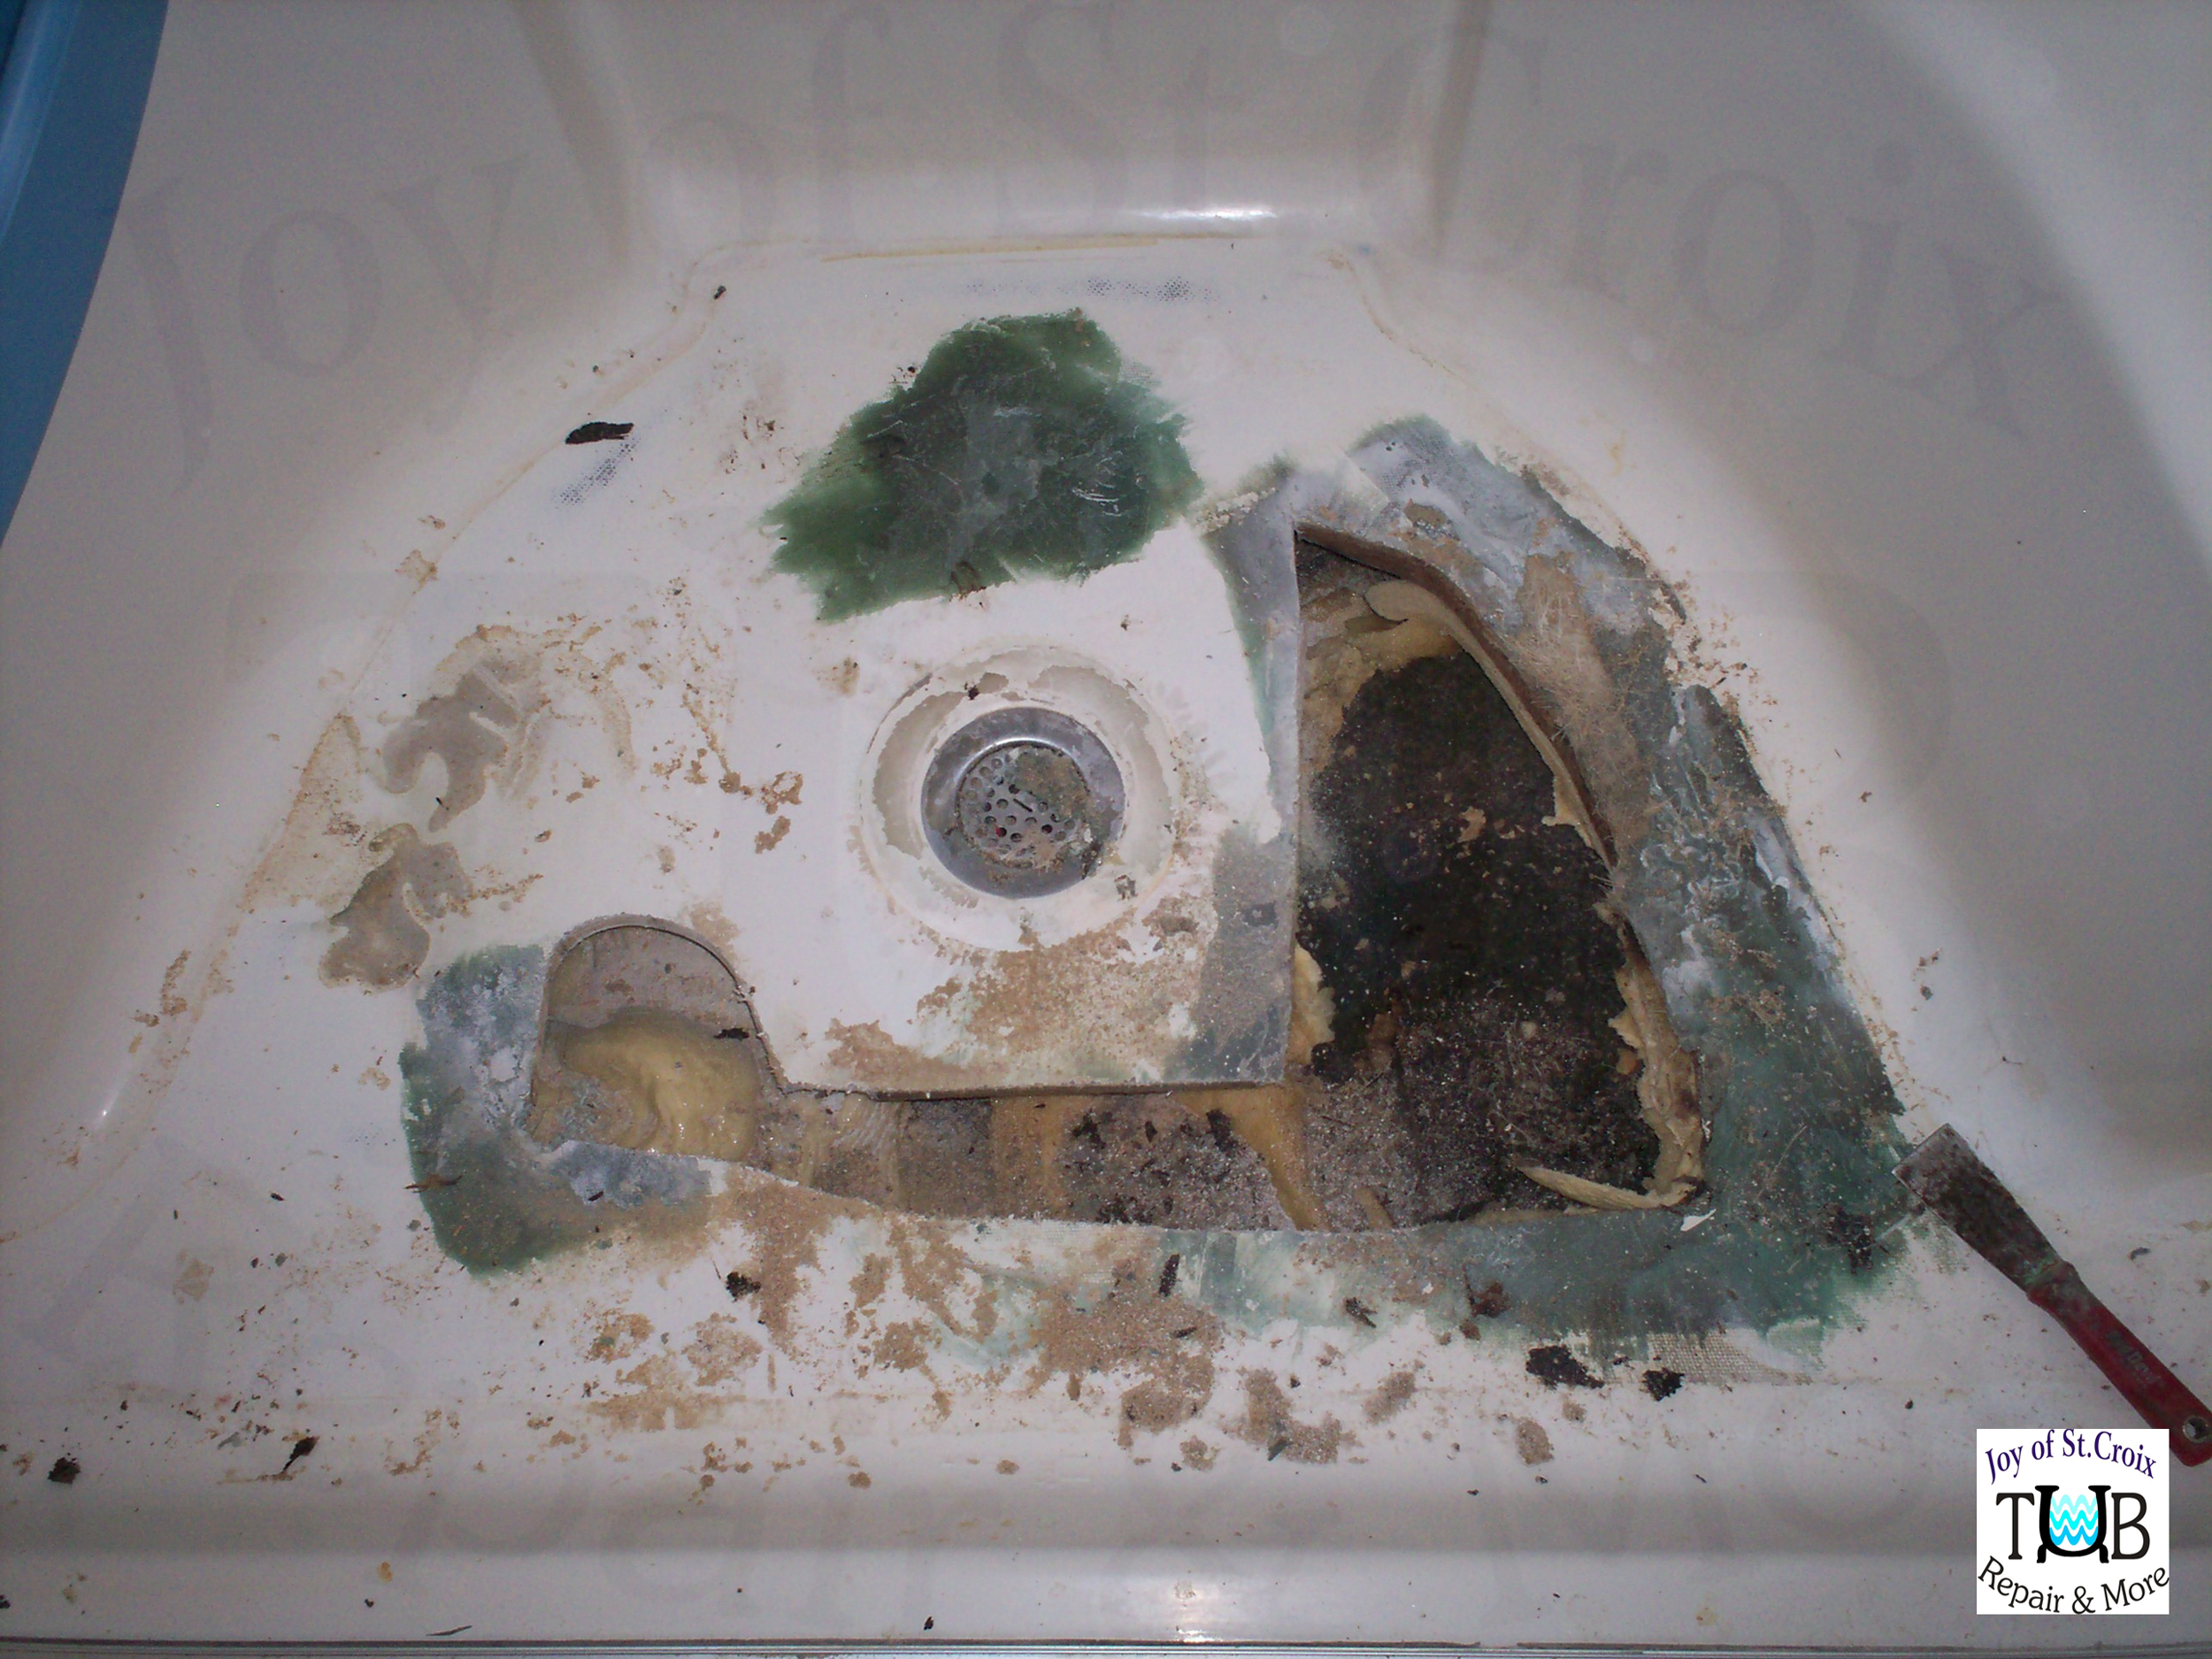
The weak and spongey area had a slight but distinct pinkish discolouration on the glued-on mat. The four corners of the soft and sagging area wass marked out by drilling holes and then cutting out the the marked area. Two holes pulled up wood shavings from the core; one of which was water-logged and one showing dry-rot. Two holes pulled up no shavings at all indicating no core present in those locations. 

a cracked glued-on bathmat has four holes drilled in it and labled A, B,C,D. text-holes are drilled at the corners of the soft and sagging area. logo-Joy of St Croix
marking the area to be removed
a hole drilled in a cracked glued-on bathmat marked A next to a pile of wood shavings. text-drilling pulled up shavings that had dry rotted. logo-Joy of St Croix
wood shavings exhibit dry rot
a hole drilled in a cracked glued-on bathmat marked B next to a pile of wood shavings. text-drilling pulled up shavings that had dry rotted. logo-Joy of St Croix
wood shavings exhibit wet rot
a cracked glued-on bathmat has four holes drilled in it. text-the perimeter of the soft area is marked out with drill holes. logo-Joy of St Croix
the soft and sagging area is marked for removal

invasive inspection

So far we know that the unit is broken and the damaged area needs to be removed in order to determine the extent and possibility of the repair. Holes were drilled at the four corners of the perimeter surrounding the floor's spongey area to remove a section of the floor and expose the subfloor. The top layer of fiberglass, with the mat glued to it, was completely delaminated from the core and lifted straight off. Many composite showers do not have a complete core but are constructed of various pieces of OSB (chipboard); a 12" x 30' area next to the drain running from the rear of the unit to the front was completely missing. The lower layer of fiberglass where the piece was missing was completely disintegrated. 

a cracked glued-on bathmat has four holes drilled in it. text-the perimeter of the soft area is marked out with drill holes. logo-Joy of St Croix
the soft and sagging area is marked for removal
top layer of fiberglass removed from a broken fiberglass bathtub revealing a damaged corr. text- top layer is removed, half is missing and half is rotting away
the top layer is removed to reveal the damaged core
the partially rotting and missing core of a broken fiberglass shower floor. text- the bottom layer of fiberglass lays disintegrated on the subfloor. logo- Joy of St Croix
the bottom layer of fiberglass lays disintegrated on the subfloor
expanding foam underneath a broken fiberglass shower floor. text- the magic foam acted as a fulcrum and ironically added to the failure of the unit. logo- Joy of St Croix
expanding foam is useless as support

condition of core

The remaining core in the inspection area was removed and examined. The core was completely rotted; dry rot in some areas and water logged in others. The lower layer of fiberglass was stained showing the path of water infiltration and pooling. The cause of the disintegration of the lower layer of fiberglass where the core was missing was the continual pooling of water that wicked in through the cracks in the upper layer of fiberglass that was never properly reglassed. Fiberglass is not water impermeable and will easily disintegrate under constant exposure. Without any support it readily collapsed under its oen weight.

a removed section of rotting core from a broken fiberglass bathtub. text- the core was completely rotted. logo- Joy of St Croix
the core was completely rotted
the bottom layer of fiberglass from a removed rotted core in a fiberglass shower floor. text- bottom layer of fiberglass shows path of water infiltration. logo- Joy of St Croix
bottom layer of fiberglass shows the path of water infiltration

presence of expanding foam

The glued-on mat suggested that expanding foam was used, and unfortunately that was the case. One of the problems with expandable foam is that it's area of expansion is uncontrollable; it just doesn't go where you want it to or stay where it's supposed to. The mystery of why there was no foam around the drain area was solved when we looked under the house to examine the subfloor. They injected foam right out of the subfloor's access hole and into the basement. Another problem is that it acts as a sponge and holds water stagnant. The use of expanding foam in this instance was less than useless as open cell window insulation foam was employed instead of a closed cell flotation or taxidermy foam - it gave absolutely no structural support and was sparse and haphazard. In fact, it probably contributed to the need for replacement because it kept the subfloor wet rather than allowing the water to drain away, thus degrading the subfloor.

a small strip of expanded foam lays on the subfloor beneath a fiberglass shower floor surrounded by the remnants of the rotted core. text- the magic foam was less than useless if the intent was support. logo- Joy of St Croix
the expandable foam was less than useless if the intent was to be a support structure
a screwdriver scrapes away layers of the deteriorating subfloor. text- the magic foam acted as a sponge causing the subfloor to mold and rot. logo- Joy of St Croix
the injected expandable foam acted as a sponge causing the subfloor to mold and rot

inspection's conclusion

The Inspection's  conclusion was that the shower's floor had experienced catastrophic failure. While the shower's floor could be rebuilt the condition of the subfloor was too deteriorated to justify the expense. The final assessment of the Joy of St Croix field crew was that the shower unit be removed and the subfloor be replaced. This unit was deemed ineligible for repair by Joy of St Croix. 

Joy of St Croix - Tub Repair and More
does not use expanding foam and a glued-on mat.

Joy of St Croix cuts out the damaged area and rebuilds the bathtub floor with support, fiberglass, and new core. 

Discover how a bathtub floor is constructed and why it breaks

a drawing explaining how cracks in a bathtub floor are caused by tension or compression
cracks in fiberglass are caused by tension and compression
Order your visual inspection today with a written quote from Joy of St Croix
visual inspection
visual inspection
Use your phone to compare the damage on the bathtub to repair photos on our site and estimate the cost for repair by the size of the damage. Published prices at https://www.joyofstcroix.com
Use your phone to compare the damage on the bathtub to repair photos on our site and estimate the cost for repair by the size of the damage
Posted on 1 Comment

How do I clean my bathtub?

cleaning with chemistry

How do I clean my bathtub?

Understand the Science and Trust the chemicals

don't mix bleach
don't mix bleach

Bleach is DANGEROUS

Bleach is a sanitizer - not a cleaner
Please - Don't use bleach to clean


Look on the back of the bottle; if the label warns not to mix with bleach, it's because it will create a gas that can do serious harm to your short term and long term health.

bleach releases chlorine gas
chart listing common household chemicals that should not be mixed together
don't mix these household chemicals

1) Above all - clean with chemistry, not advertising:

Soap is Lye, Fat, and Water - its "free" molecule attracts fat molecules, which is how it cleans. When water in the bath evaporates it leaves behind both the soap-fat combination and the minerals that were in the water... "Soap Scum".

* Soap, waxes and oils need an emulsifier like D-limonene or T-limonene; "D" comes from citrus oil like oranges, and "T" comes from tree oil like pine... pine solvent...Pine-Sol-Vent. Cheap and easy to find - that's nice.

* Mineral deposits require an acid or an alkali and water to dissolve them.

Some mineral deposits are light enough to be removed with vinegar or lemon juice. Both are mild and safe acids used for general cleaning all around the house.

The acids in products bought off the shelf can cause problems with some finishes and are not safe to have around some other household chemicals.

An organic salt (an alkali) is safer but may be hard to find; you can narrow it down by noting if the "caution" label warns "do not mix with bleach" - which usually means it's an acid.

Not all alkalis are safe, either, but the ones you typically find in a residential grocery store are non-reactive with other household cleaning chemicals and are septic system safe.

Remember, never casually mix chemicals trying to create a "super-cleaner" - toxic gases, fires, and explosions are common-place reactions in chemistry.

Organic acid cleaners

2) The most avoided step - clean in layers:

That impressive wall of white soap scum consists of dirt, body-stuff, minerals, and cleaning products. It was built one daily shower after another, like layers of sedimentary rock, layers upon layers built over time.

The cleaning chemical bonds to the soap scum to form an emulsified layer, or slurry. The cleanser cannot get past that emulsified layer and needs to be removed by rinsing.

Rinse it away and repeat - that simple. The first time you may have to remove multiple layers, but with regular cleaning it will be a breeze.

mineral deposits are removed by cleaning in layers
mineral deposits and soap scum are removed layer by layer

3) Finally, clean regularly:

Keep those layers of soap-scum and minerals thin so that your cleaning day isn't all day. To reduce the amount of cleaning you have to do, reduce the water that will evaporate and leave soap scum.

After showering, wipe down the surface with a wash cloth or a bath chamois. The less water, the quicker your unit dries; the quicker it dries, the less chance for mold or mildew to grow.

wipe down the shower
wipe that shower down to remove excess water
Joy of St Croix - Tub Repair and More repairs and refinishes bathtubs since 1980. https://www.joyofstcroix.com

Joy of St Croix
Tub Repair and More

Joy of St Croix - Tub Repair and More has been repairing and refinishing bathtubs since 1980.