Picasso's "The Old Beggar" demonstrates mastery of hue, tint, tone, and shade

How to use Hue, Tint, Tone, and Shade

What's the difference between Hue, Tint, Tone, and Shade?

When I was a little girl, the world was in black and white - no colors. Color wasn't invented until I was around 10 years old, and then all of the world's great paintings sprang to life in a burst of more colors than I could find in my big crayon box with the sharpener in the back. I was poking around in my mother's library when I found a book on Pablo Piscasso's "Blue Period". My mind staggered - how could he possibly  create such depth of field and fore with just one color? I tried to copy his paintings, and predictably failed. It wasn't because I was a 10 year old kid, but because I had no idea what color was. More significantly, I had no idea how to manipulate it. Oddly enough, I learned about color theory in a book on photography - when it was all black and white. But, that's a story for a different blog post.

The basics of color manipulation

Try this for a while - don't use a color right out of the container, always manipulate it first. Why? Well, let's start out with the practical - you can't afford every color. Now let's move on to what's most important - no one makes every color, and you need more colors!!

Here's a cheap way to enhance your range of colors while sneaking in some color theory past your brains natural "I don't wanna study" reflex:
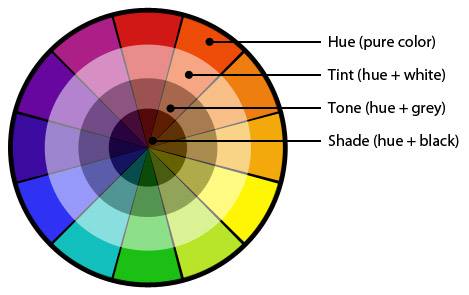
simple guide to hue, tint, tone, and shade

Hue - pure color, right out of the container
Tint - pure color plus white
Tone - pure color plus grey
Shade - pure color plus black

That's not just four lonely colors - there's a whole range you can create by adding a bit more or bit less...and no one's stopping you from mixing a bit of the tint with that shade.

Putting your new color theory to the test

Skills are only developed by working at them, which means you're going to have to get that brush wet. Go get three colors: white, black, and a hue that turns you on...or whatever you have on hand.
On your palette, mix up your range of Hue, Tint, Tone, and Shade.
Now...stretch your imagination, and consider the following:

identifying the light sources and shadows of a cylinder

Paint a cylinder that casts a shadow on the horizontal surface it rests on and reflects its color on the vertical surface behind it. Use only that one color's range of Hue, Tint, Tone, and Shade.

Where will you employ the Tint vs the Tone? Ask yourself - where is the light source?

Will both the shadow and the reflection use only one of your new colors or will they be multi-colored? Again, ask yourself - where is the light source?

The 500 year old color exercise

"Sperimentare di non limitarsi a ciò che si pensa di che sapere - Experiment with not limiting yourself to what you think you know"

That axiom sounds like a motivational poster or a meme, but it's actually an ongoing "homework" assignment in a classical botteghe. It becomes an automatic task whenever you encounter a new formula of paint:

It doesn't matter that you KNOW that blue and yellow make green, do you KNOW if this new formula makes the same green that the last one did? Will this new formula produce the same colors with the methods you've been using?

mixing colours

Experiment, even if you're saying to yourself, "I already know this". That's just your brain's natural "Awwhhh, I don't wannnah study" reflex...sneak it in.

cleaning with chemistry

How do I clean my bathtub?

How do I clean my bathtub?

Understand the Science and Trust the chemicals

don't mix bleach
don't mix bleach

Bleach is DANGEROUS

Bleach is a sanitizer - not a cleaner
Please - Don't use bleach to clean


Look on the back of the bottle; if the label warns not to mix with bleach, it's because it will create a gas that can do serious harm to your short term and long term health.

bleach releases chlorine gas
chart listing common household chemicals that should not be mixed together
don't mix these household chemicals

1) Above all - clean with chemistry, not advertising:

Soap is Lye, Fat, and Water - its "free" molecule attracts fat molecules, which is how it cleans. When water in the bath evaporates it leaves behind both the soap-fat combination and the minerals that were in the water... "Soap Scum".

* Soap, waxes and oils need an emulsifier like D-limonene or T-limonene; "D" comes from citrus oil like oranges, and "T" comes from tree oil like pine... pine solvent...Pine-Sol-Vent. Cheap and easy to find - that's nice.

* Mineral deposits require an acid or an alkali and water to dissolve them.

Some mineral deposits are light enough to be removed with vinegar or lemon juice. Both are mild and safe acids used for general cleaning all around the house.

The acids in products bought off the shelf can cause problems with some finishes and are not safe to have around some other household chemicals.

An organic salt (an alkali) is safer but may be hard to find; you can narrow it down by noting if the "caution" label warns "do not mix with bleach" - which usually means it's an acid.

Not all alkalis are safe, either, but the ones you typically find in a residential grocery store are non-reactive with other household cleaning chemicals and are septic system safe.

Remember, never casually mix chemicals trying to create a "super-cleaner" - toxic gases, fires, and explosions are common-place reactions in chemistry.

Organic acid cleaners

2) The most avoided step - clean in layers:

That impressive wall of white soap scum consists of dirt, body-stuff, minerals, and cleaning products. It was built one daily shower after another, like layers of sedimentary rock, layers upon layers built over time.

The cleaning chemical bonds to the soap scum to form an emulsified layer, or slurry. The cleanser cannot get past that emulsified layer and needs to be removed by rinsing.

Rinse it away and repeat - that simple. The first time you may have to remove multiple layers, but with regular cleaning it will be a breeze.

mineral deposits are removed by cleaning in layers
mineral deposits and soap scum are removed layer by layer

3) Finally, clean regularly:

Keep those layers of soap-scum and minerals thin so that your cleaning day isn't all day. To reduce the amount of cleaning you have to do, reduce the water that will evaporate and leave soap scum.

After showering, wipe down the surface with a wash cloth or a bath chamois. The less water, the quicker your unit dries; the quicker it dries, the less chance for mold or mildew to grow.

wipe down the shower
wipe that shower down to remove excess water
Joy of St Croix - Tub Repair and More repairs and refinishes bathtubs since 1980. https://www.joyofstcroix.com

Joy of St Croix
Tub Repair and More

Joy of St Croix - Tub Repair and More has been repairing and refinishing bathtubs since 1980.